Technology Overview
Learn the basics of the core parts of CanJS's technology.
Overview
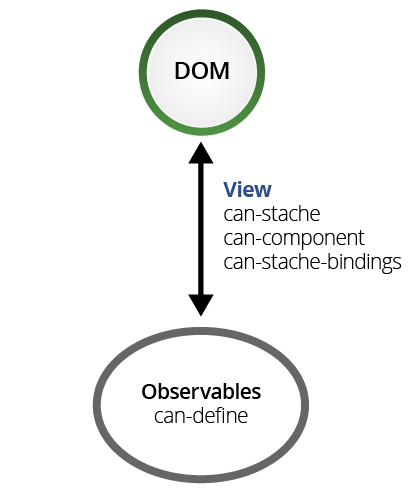
CanJS, at its most simplified, consists of key-value Observables connected to different web browser APIs through various connecting libraries.

The general idea is that you create observable objects that encapsulate the logic and state of your application and connect those observable objects to:
- The Document Object Model (DOM) to update your page automatically.
- The route to support the forward and back button.
- Your service layer to make receiving, creating, updating, and deleting server data easier.
Instead of worrying about calling the various browser APIs, CanJS abstracts this away, so you can focus on the logic of your application. The logic of your application is contained within observables.
The rest of this guide walks you through:
- Defining your own key-value observable types and adding logic to them.
- Connecting those observables to DOM elements using:
- stache templates like
<span>{{count}}</span>, - bindings like
<input value:bind='count'>, and - components that create custom elements like
<my-counter/>.
- stache templates like
- Connecting observables to the browser's location and building an example app that routes between different pages, including a login screen.
Key-Value Observables
The DefineMap and DefineList Observables define the logic and state in your application. For example, if we wanted to model a simple counter, we can use DefineMap as follows:
import DefineMap from "can-define/map/map";
const Counter = DefineMap.extend({
    count: {default: 0},
    increment() {
        this.count++;
    }
});
We can create instances of Counter, call its methods, and
inspect its state like so:
const myCounter = new Counter();
myCounter.count //-> 0
myCounter.increment()
myCounter.count //-> 1
myCounter is an instance of Counter. myCounter.count is what we call the state of the myCounter instance. myCounter.increment is part of the logic that controls the
state of myCounter.
NOTE: CanJS application logic is coded within instances of
DefineMapandDefineList. You often don’t need the DOM for unit testing!
DefineMap and DefineList have a wide variety of features (and shorthands)
for defining property behavior. In the previous example, count: {default: 0} defined the count property to
have an initial value of 0. The {default: 0} object is a PropDefinition.
The following example uses the default and get property
definition behaviors to define a TodosApp constructor function's todos and completeCount
property behavior:
const TodosApp = DefineMap.extend({
    todos: {
        // todos defaults to a DefineList of todo data.
        default: () => new DefineList([
            {complete: true, name: "Do the dishes."},
            {complete: true, name: "Wash the car."},
            {complete: false, name: "Learn CanJS."}
        ])
    },
    // completedCount is the number of completed todos in the `todos`
    // property.
    completeCount: {
        get() {
            return this.todos.filter({complete: true}).length
        }
    }
});
Instances of TodosApp will have default todos value and a completeCount
that dynamically changes when todos changes:
const todosApp = new TodosApp();
todosApp.todos //-> DefineList[{complete: true, name: "Do the dishes."}, ...]

todosApp.completeCount //-> 2

todosApp.todos[2].complete = true;

todosApp.completeCount //-> 3
Observables and HTML Elements
CanJS's pattern is that you define application logic in one or
more observables, then you connect these observables to
various browser APIs. The page's HTML (DOM) is the
most common browser API people need to connect to. can-stache, can-stache-bindings
and can-component are used to connect the DOM
to observables like myCounter. We can create HTML that:
- Calls methods on observables using can-stache-bindings.
- Updates the page when the state of an observable changes using can-stache.
The following example increments the Count when the is clicked:
NOTE: Click the JS tab to see the code.
The demo uses a can-stache view:
const view = stache(`
  <button on:click='increment()'>+1</button>
  Count: <span>{{count}}</span>
`);
The view:
- Updates a
<span/>when the state ofmyCounterchanges using{{count}}. - Creates a button that calls methods on
myCounterwhen DOM events happen usingon:click='increment()'.
Stache templates and bindings
can-stache is used to create HTML that updates automatically when observable state changes. It uses magic tags to read values and perform simple logic. The following are the most commonly used tags:
- {{expression}} - Inserts the result of
expressionin the page.Count: <span>{{count}}</span> - {{#if(expression)}} - Render the block content if the expression evaluates
to a truthy value; otherwise, render the inverse content.
{{#if(count)}} Count not 0 {{else}} Count is 0 {{/if}} - {{#is(expressions)}} - Render the block content if all comma seperated expressions
evaluate to the same value; otherwise, render the inverse content.
{{#is(count, 1)}} Count is 1 {{else}} Count is not 1 {{/if}} - {{#each(expression)}} - Render the block content for each item in the list the expression evaluates to.
{{#each(items)}} {{name}} {{/each}}
can-stache-bindings is used pass values between the DOM and observables and call methods on observables. Use it to:
- Call methods on observables when DOM events happen. The following uses
on:event to call
doSomethingwith the<input>'s value on akeypressevent:<input on:keypress="doSomething(scope.element.value)"/> - Update observables with element attribute and property values. The following uses toParent:to
to send the
<input>'s value to an observable'scountproperty.<input value:to="count"/> - Update element attribute and property values with observable values. The following uses toChild:from
to update the
<input>'s value from an observable'scountproperty.<input value:from="count"/> - Cross bind element attribute and property values with observable values. The following uses
twoWay:bind to update the
<input>'s value from an observable'scountproperty and vice versa:<input value:bind="count"/>
The following demo:
- Loops through a list of todos with {{#each(expression)}} -
{{#each( todos )}} ... {{/each}}. - Write out if all todos are complete with {{#is(expressions)}} -
{{#is( completeCount, todos.length )}}. - Update the
completestate of a todo when a checkbox is checked and vice-versa with twoWay:bind -checked:bind='complete'. - Completes every todo with on:event -
on:click='completeAll()'.
Components
The final core view library is can-component.
can-component is used to create customs elements. Custom elements are used to
encapsulate widgets or application logic. For example, you
might use can-component to create a <percent-slider> element that creates a
slider widget on the page:
Or, you might use can-component to make a <task-editor> that uses <percent-slider>
and manages the application logic around editing a todo:
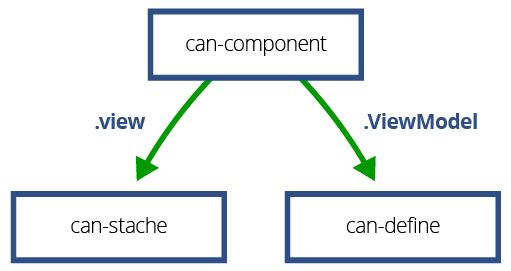
A can-component is a combination of:
- a DefineMap observable,
- a can-stache view, and
- a registered tag name.
For example, the following demo defines and uses a <my-counter> custom element. Hit the button
to see it count.
The demo defines the <my-counter> element with:
- The
Counterobservable constructor as shown in the Key-Value Observables section of this guide:import DefineMap from "can-define/map/map"; const Counter = DefineMap.extend({ count: {default: 0}, increment() { this.count++; } }); - The can-stache view that incremented the counter as shown in the beginning of this guide:
import stache from "can-stache"; const view = stache(` <button on:click='increment()'>+1</button> Count: <span>{{count}}</span> `); - A can-component that combines the
Counterandviewas follows:import Component from "can-component"; Component.extend({ tag: "my-counter", ViewModel: Counter, view: view });
The demo then creates a <my-counter> element like:
<my-counter></my-counter>
So components are just a combination of a can-stache view and a DefineMap observable. can-component calls the observable a ViewModel. This is because CanJS's observables are typically built within a Model-View-ViewModel (MVVM) architecture.
Instead of creating the view, view-model as separate entities, they are often done together as follows:
import Component from "can-component";

Component.extend({
    tag: "my-counter",
    view: `
        <button on:click='increment()'>+1</button>
        Count: <span>{{count}}</span>
    `,
    ViewModel: {
        count: {default: 0},
        increment() {
            this.count++;
        }
    }
});
can-component will create a can-stache template from a string view value
and define a DefineMap type from a plain
object ViewModel value. This is a useful short-hand for creating components. We will use it for all components going forward.
Passing data to and from components
Components are created by inserting their tag in the DOM or
another can-stache view. For example, <my-counter></my-counter> creates an instance of the
ViewModel and renders it with the view and inserts the resulting HTML inside the <my-counter> tag.
can-stache-bindings can be used to pass values between component ViewModels and can-stache's scope. For example, we can start the counter's count at 5 with the following:
<my-counter count:from='5'></my-counter>
This is shown in the following demo:
can-stache's scope is usually made up of other component ViewModels. can-stache-bindings
passes values from one ViewModel to another. For example, the <task-editor> component
connects its progress property to the value property of the <my-slider> with:
<percent-slider value:bind='progress'/>
So on a high-level, CanJS applications are composed of components whose logic is managed by an observable view-model and whose views create other components. The following might be the topology of an example application:
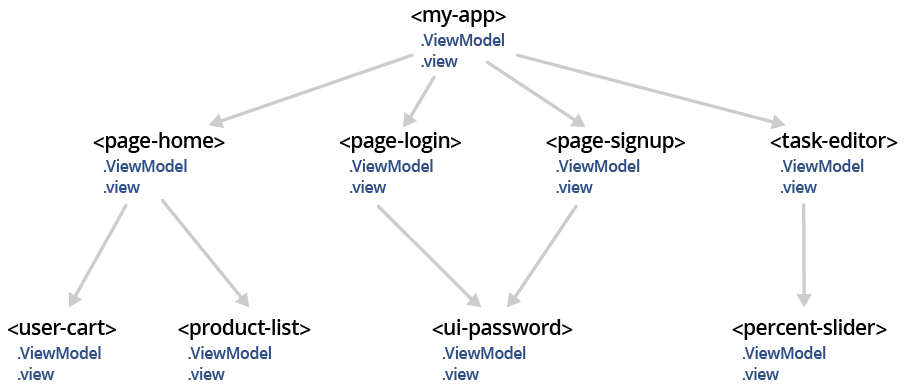
Notice that <my-app>'s view will
render either <page-login>, <page-signup>,
<page-products>, or <page-purchase> based on
the state of it's view-model. Those page-level components
might use sub-components themselves like <ui-password> or <product-list>.
Observables and the browser's location
CanJS's pattern is that you define application logic in one or
more observables, then connect the observables to
various browser APIs. For example, you can connect the myCounter observable from
the Key-Value Observables section to window.location with:
import route from "can-route";

route.data = myCounter;
route.start();
This will add #!&count=0 to the location hash.
Now, if you called increment() on my counter, the window.location would
change to #!count=1. If you hit the back-button, myCounter.count would be
back to 0:
myCounter.increment()
window.location.hash  //-> "#!&count=1"

history.back()
myCounter.count       //-> 0
window.location.hash  //-> "#!&count=0"
can-route is used to setup a bi-directional relationship with an observable and the browser's location.

By default, can-route serializes the observable's data with can-param,
so that the following observable data produces the following url hashes:
{foo: "bar"}          //-> "#!&foo=bar"
{foo: ["bar", "baz"]} //-> "#!&foo[]=bar&foo[]=baz"
{foo: {bar: "baz"}}   //-> "#!&foo[bar]=baz"
{foo: "bar & baz"}    //-> "#!&foo=bar+%26+baz"
NOTE 1: This guide uses hash-based routing instead of pushstate because hash-based routing is easier to setup. Pushstate routing requires server-support. Use can-route-pushstate for pushstate-based applications. The use of can-route-pushstate is almost identical to can-route.
NOTE 2: can-route uses hash-bangs (
#!) to comply with a now-deprecated Google SEO recommendation.
You can register routes that controls the relationship between the observable and the browser's location. The following registers a translation between URLs and route properties:
route.register("{count}")
This results in the following translation between observable data and url hashes:
{count: 0}                  //-> "#!0"
{count: 1}                  //-> "#!1"
{count: 1, type: "counter"} //-> "#!1&type=counter"
You can add data when the url is matched. The following registers data for when the URL is matched:
route.register("products", {page: "products"});
route.register("products/{id}", {page: "products"})
This results in the following translation between observable data and url hashes:
{page: "products"}          //-> "#!products"
{page: "products", id: 4}   //-> "#!products/4"
Registering the empty route ("") provides initial state for the
application. The following makes sure the count starts at 0 when the hash is empty:
route.register("",{count: 0});
Routing and the root component
Understanding how to use can-route within an application comprised of can-components and their can-stache views and observable view-models can be tricky.
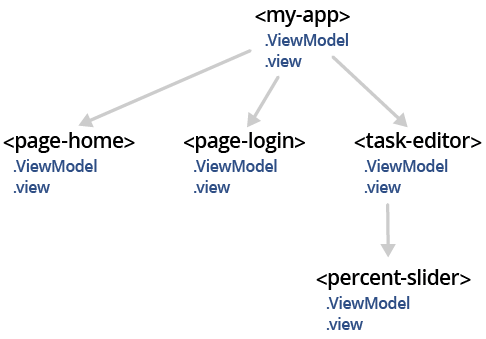
We'll use the following example to help make sense of it:
This example shows the <page-login> component until someone has logged in. Once they have
done that, it shows a particular component based upon the hash. If the hash is empty ("" or "#!"),
the <page-home> component is shown. If the hash is like tasks/{taskId} it will show the <task-editor> component we created previously. (NOTE: We will show how to persist changes
to todos in a upcoming service layer section.)
The switching between different components is managed by a <my-app> component. The topology of
the application looks like:
In most applications, can-route is connected to the top-level component's
ViewModel. We are going to go through the process of
building <my-app> and connecting it
to can-route. This is usually done in four steps:
- Connect the top-level component's view-model to the routing data.
- Have the top-level component's view display the right sub-components based on the view-model state.
- Define the top-level component's view-model (sometimes called application view-model).
- Register routes that translate between the URL and the application view-model.
Connect a component's view-model to can-route
To connect a component's view-model to can-route, we first need to create a basic
component. The following creates a <my-app> component that displays its page property and
includes links that will change the page property:
import Component from "can-component";
import stache from "can-stache";
import DefineMap from "can-define/map/map";
import route from "can-route";
import "can-stache-route-helpers";

Component.extend({
    tag: "my-app",
    view: stache(`
        The current page is {{page}}.
        <a href="{{ routeURL(page='home') }}">Home</a>
        <a href="{{ routeURL(page='tasks') }}">Tasks</a>
    `),
    ViewModel: {
        page: "string"
    }
})
NOTE: Your html needs a
<my-app></my-app>element to be able to see the component's content. It should say "The current page is .".
To connect the component's VM to the url, we:
route.data = document.querySelector("my-app");
route.start();
At this point, changes in the URL will cause changes in the page
property. See this by clicking the links and the back/refresh buttons below:
Display the right sub-components
When building components, we suggest designing the view before the ViewModel. This helps you figure out what logic the ViewModel needs to provide an easily understood view.
We'll use {{#switch(expression)}} to switch between different components
based on a componentToShow property on the view-model. The result looks like the following:
Component.extend({
    tag: "my-app",
    view: stache(`
        {{#switch(componentToShow)}}
            {{#case("home")}}
                <page-home isLoggedIn:from="isLoggedIn" logout:from="logout"/>
            {{/case}}
            {{#case("tasks")}}
                <task-editor id:from="taskId" logout:from="logout"/>
            {{/case}}
            {{#case("login")}}
                <page-login isLoggedIn:bind="isLoggedIn" />
            {{/case}}
            {{#default}}
                <h2>Page Missing</h2>
            {{/default}}
        {{/switch}}
    `),
    ...
})
Notice that the view-model will need the following properties:
- isLoggedIn - If the user is logged in.
- logout - A function that when called logs the user out.
- taskId - A taskId in the hash.
We will implement these properties and componentToShow in the
ViewModel.
Define the view-model
Now that we've designed the view it's time to code the observable view-model
with the logic to make the view behave correctly. We implement the
ViewModel as follows:
Component.extend({
    tag: "my-app",
    ...
    ViewModel: {
        // Properties that come from the url
        page: "string",
        taskId: "string",

        // A property if the user has logged in.
        // `serialize: false` keeps `isLoggedIn` from
        // affecting the `url` and vice-versa.
        isLoggedIn: {
            default: false,
            type: "boolean",
            serialize: false
        },

        // We show the login page if someone
        // isn't logged in, otherwise, we
        // show what the url points to.
        get componentToShow(){
            if(!this.isLoggedIn) {
                return "login";
            }
            return this.page;
        },

        // A function we pass to sub-components
        // so they can log out.
        logout() {
            this.isLoggedIn = false;
        }
    }
});
NOTE: The serialize property behavior controls the serializable properties of a DefineMap. Only serializable properties of the map are used by can-route to update the url.
serialize: falsekeepsisLoggedInfrom affecting theurland vice-versa. Getters likecomponentToShoware automatically configured withserialize: false.
Finally, our component works, but the urls aren't easy to
remember (ex: #!&page=home). We will clean that up in the
next section.
Register routes
Currently, after the user logs in, the application will show <h2>Page Missing</h2> because if the url hash is empty, page property will be undefined. To have page
be "home", one would have to navigate to "#!&page=home" ... yuck!
We want the page property to be "home" when the hash is empty. Furthermore,
we want urls like #!tasks to set the page property. We can do that
by registering the following route:
route.register("{page}", {page: "home"});
Finally, we want #!tasks/5 to set page to "tasks" and taskId
to "5". Registering the following route does that:
route.register("tasks/{taskId}", {page: "tasks"});
Now the mini application is able to translate changes in the url to properties on the component's view-model. When the component's view-model changes, the view updates the page.